Honda/Acura airbag Code 8-1 and/or 8-5
OPDS weight sensor initialization calibration
What is OPDS?
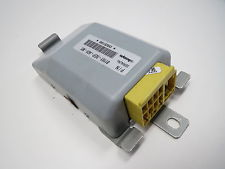
OPDS is the Occupant Position Detection System used to detect the size of the occupant in the passenger seat. If it detects a child sitting in the seat, it will not deploy the airbag.
Was the passenger seat replaced with a new or old seat?
If you replaced passenger seat
Then you will need to find the old seat and transfer the OPDS from the old seat to the new seat and code should go away. If it does not then you will need to use a scan tool to initialize/calibrate the OPDS to the SRS airbag module. There is an option for this in the scan tool under SRS Airbag menu to initialize, calibrate, and zero out the OPDS. For a manual option see below at MES reset.
If the seat was not changed and is the original seat
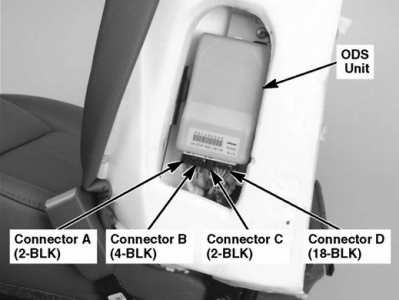
Then take a look under the seat at all of the wiring to make sure you are connected and no wires are damaged or pinched. Next step is to calibrate / initialize the OPDS weight sensor with a scan tool. There is an option for this in the scan tool under SRS Airbag menu to initialize, calibrate, and zero out the OPDS.
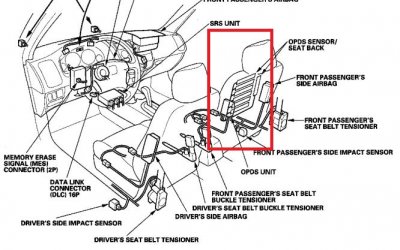
OPDS Location in vehicle
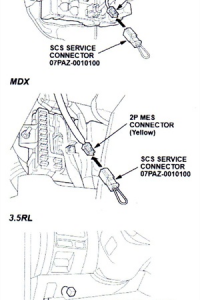
Use built-in MES connector to initialize/calibrate OPDS
Some Honda/Acura vehicles have MES connector under the steering wheel next to the fuse box.
To work properly, the OPDS (occupant position detection system) unit must be initialized whenever you replace the SRS unit, the OPDS unit, or the seat-back cover or seat-back cushion in the front passenger seat.
You can initialize the OPDS unit two different ways: 1) using the Honda Diagnostic System (HDS) or 2) using the manual mode.
INITIALIZING OPDS WITH HDS
- Adjust the front passenger seat-back to a normal upright position, and remove anything that is on or near the seat.
- Start the engine and turn on the A/C. Close the doors and windows, and run the A/C in Recirculation mode for 30 minutes. This will dry out any moisture that may be in the front passenger seat.
- Turn the ignition switch to LOCK.
- Connect the HDS with the latest software version to the 16P data link connector (DLC).
- Turn the ignition switch to the ON position and then turn on the HDS.
- At the screen prompts, enter the VIN and the odometer reading, and then verify the correct date and time.
- From the System Selection Menu screen, select SRS.
- From the Mode menu screen, select Miscellaneous Test.
- From the Miscellaneous Test Menu screen, select OPDS Initialization.
- Follow the remaining screen prompts to complete the OPDS initialization process. If the initialization fails, try initializing the OPDS unit in the Manual Mode.
MANUAL MODE
- Adjust the front passenger seat-back to a normal upright position and remove anything on or near the seat.
- Start the engine and turn on the A/C. Close the doors and windows and run the A/C in recirculation mode for 30 minutes.
- Turn the ignition switch to LOCK.
- On all models except 3.5RL, connect the HDS with the latest software to the DLC. Leave the ignition switch in the LOCK position. Turn on the HDS.
- 3.5RL only: Plug the SCS service connector into the 2P service check connector. Do not use a jumper wire. In ISIS, use the keyword OPDS and select Initializing the OPDS from the list. Go to Step 7.
- From the Select Mode screen, select SCS and follow the screen prompts.
- Plug the SCS service connector into the 2P memory erase signal connector (MES). Do not use a jumper wire. For a 3.5RL, you need a second SCS service connector for this step.
- Turn the ignition switch to ON.
- Watch the SRS indicator. It comes on for about 6 seconds and then goes off. Unplug the SCS service connector from the 2P MES connector within 4 seconds after the indicator goes off.
- When the SRS indicator comes on again, plug the SCS service connector into the 2P MES connector within 4 seconds after the indicator comes on.
- When the SRS indicator goes off, unplug the SCS service connector from the 2P MES connector within 4 seconds.
- Watch the SRS indicator:
- If the indicator blinks twice and then goes off, the OPDS unit is initialized. Turn the ignition switch to LOCK and disconnect the HDS (all models except 3.5RL) or unplug the SCS service connector from the 2P service check connector (3.5RL only).
- If the indicator blinks twice and then stays on, the OPDS unit is initialized, but the SRS DTCs need to be cleared. Go to Step 13.
- If the indicator stays on without first blinking, the OPDS unit is not initialized. Repeat Steps 3 through 10.
- Turn the ignition switch to LOCK. Disconnect the HDS (all models except 3.5RL) or unplug the SCS service connector from the 2P service check connector (3.5RL only).
- Plug the SCS service connector into the 2P MES connector. Do not use a jumper wire.
- Turn the ignition switch to ON.
- Watch the SRS indicator. It comes on for about 6 seconds and then goes off. Unplug the SCS service connector from the 2P MES connector within 4 seconds after the indicator goes off.
- When the SRS indicator comes on again, plug the SCS service connector into the 2P MES connector within 4 seconds after the indicator comes on.
- When the SRS indicator goes off, unplug the SCS service connector from the 2P MES connector within 4 seconds. The SRS indicator blinks twice to indicate that the memory has been cleared.
- Turn the ignition switch to LOCK and wait for 10 seconds.
- Turn the ignition switch to ON. The SRS is OK if the indicator comes on for 6 seconds and then goes off. If the DTC clearing fails, repeat the process two more times. If the DTC clearing fails again, check for set SRS DTCs, and troubleshoot in accordance with the appropriate service manual.


